How to create a custom Google Data Studio Connector
Google Data Studio is becoming an integral part of our service offering as a reporting and dashboarding solution. It acts as a visualization platform which can take any amount of data and present it in a easy to read and meaningful format.
Data Studio requires a data source to visualize it. Connectors are the link between Data Studio and the data source. The following connectors provided by Google are available immediately:
- File Upload
- AdWords
- Attribution 360
- BigQuery
- Cloud SQL
- DCM
- Google Cloud Storage
- Google Analytics
- Google Sheets
- MySQL
- PostgreSQL
- Search Console
- YouTube Analytics
In addition there is an increasing number of connectors developed by the community to enable direct communications to any internet accessible data source. This opens up an infinite amount of data possibilities. I’ll be going through the process of creating, testing and publishing your own Data Studio connector.
Creating a new project with Apps Script
Google Apps Script is used to contain the code for your connector. This code will contain a number of specific functions and declarations which Data Studio will need each time it requests data. In this example we’ll be gathering data from Socialbakers which is a social media management tool. Socialbakers has a comprehensive API which means its data is internet accessible and therefore meets Data Studio requirements.
This particular connector will gather Facebook fan changes for a specific clients account.
Let’s get started. Access Google Apps Script to create a new script for your connector. Start by removing the predefined myFunction() function within the script.
Our first function to add will be getConfig(). This function defines the configuration rules for connector.
This connector has no configuration requirements but it does require a date range (start date and end date). This means that we’ll be requesting data for a specific date range within Data Studio for Socialbakers.
The next function called getSchema() defines the schema of the data request. This defines the name and type. We’ll be collecting date as a string field with a 'dimension' type. Data Studio will automatically recognise this as a date field and present it accordingly. We’ll also be collecting fan change as a number field with a 'metric' type. Your use of dimensions and metrics will define how data is handled and presented within Data Studio.
The getSchema() function returns the schema format defined in the socialDataSchema variable.
The getAuthType() function is used to define any special connection requirements for the data source. If the API requires OAuth2 credentials then this can be defined here. The Socialbakers API requires basic HTTP authentication so no specific rules are required here. Therefore "type" is set as "NONE".
getData() is the core function which gathers the data and maps it against the schema returned by the getAuthType() function.
startDate and endDate are variables containing the respective dates defined by the Data Studio request. We’ll need these to form part of the Socialbakers API request.
The API requires that the Socialbakers token and secret are encoded with base64 in the following format: "token:secret". We’re using the built in utility called base64Encode to do this.
The API also requires parameters to be pushed as JSON format as part of the request. optionsPost defines API credentials and also includes dataConfig as its payload.
response fetches the URL endpoint (https://api.socialbakers.com/0/facebook/metrics along with the parameters defined by optionsPost.
updated is the JSON formatted response of response.
The data stored within updated is now looped through line by line and mapped against the previously defined schema.
The remaining part of the function returns the values of dataSchema and data. If all of the above has been successful it will return valid data for Data Studio to process!
function getData(request) {var dataSchema = [];
request.fields.forEach(function(field) {for (var i = 0; i < socialDataSchema.length; i++) {if (socialDataSchema[i].name === field.name) {
dataSchema.push(socialDataSchema[i]);break;}}});var startDate = request.dateRange.startDate;var endDate = request.dateRange.endDate;var encodedData = Utilities.base64Encode("token:secret");var dataConfig = {
"date_start": startDate,
"date_end": endDate,
"profiles": ["Facebook Profile ID"],
"metrics": ["fans_change"]};var optionsPost = {
"method" : "post",
"headers" : {
"Authorization": "Basic " + encodedData,
"Content-Type": "application/json; charset=utf-8",
"Cache-Control": "no-cache"},
"payload" : JSON.stringify(dataConfig)};var response = UrlFetchApp.fetch('https://api.socialbakers.com/0/facebook/metrics', optionsPost);var updated = JSON.parse(response).profiles[0].data;var data = [];
updated.forEach(function(social) {var values = [];
dataSchema.forEach(function(field) {switch(field.name) {case 'date':
values.push(social.date);break;case 'fanChange':
values.push(social.fans_change);break;default:
values.push('');}});
data.push({
values: values});});return {
schema: dataSchema,
rows: data};};
Wrapping Up
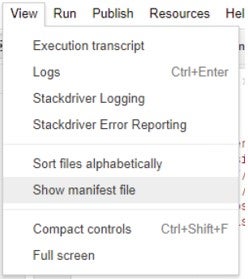
To add Data Studio context for the connector we'll need to edit the manifest file. To do this click 'View' then 'Show manifest file' within Apps Script.
The following can be placed as a placeholder within the manifest file. The 6 parameters defined below are all required. Specific manifest requirements can be found here.
{
"dataStudio": {
"name": "Name of connector here",
"company": "Company name here",
"logoUrl": "Logo URL here",
"addonUrl": "Add on here",
"supportUrl": "Support URL here",
"description": "Description of connector here"}}
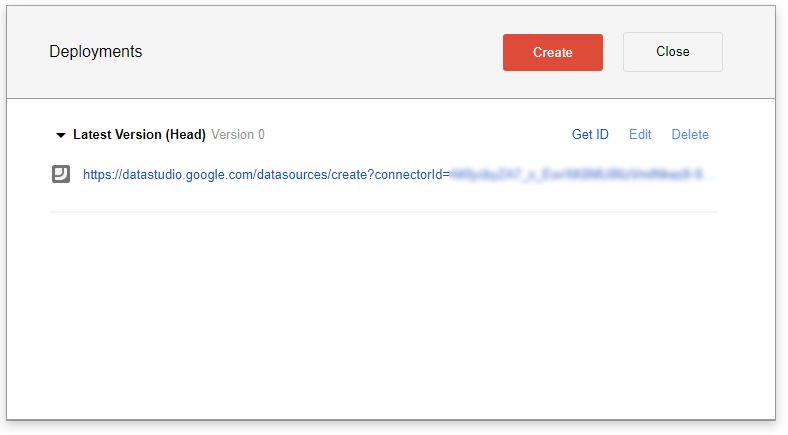
This is now ready to test! Within Google Apps Script click 'Publish' then 'Deploy from manifest…'. This will generate a Data Studio web link within the 'Latest Version' section. Click on the link.
This will take you directly to Data Studio. Click 'Connect' to approve the connector. The following screen will ask you to confirm the data types you defined in the connector schema. Click 'Create Report' once you are happy with this.

You're now feel to use Data Studio to build your dashboard. Here's one that was built earlier:
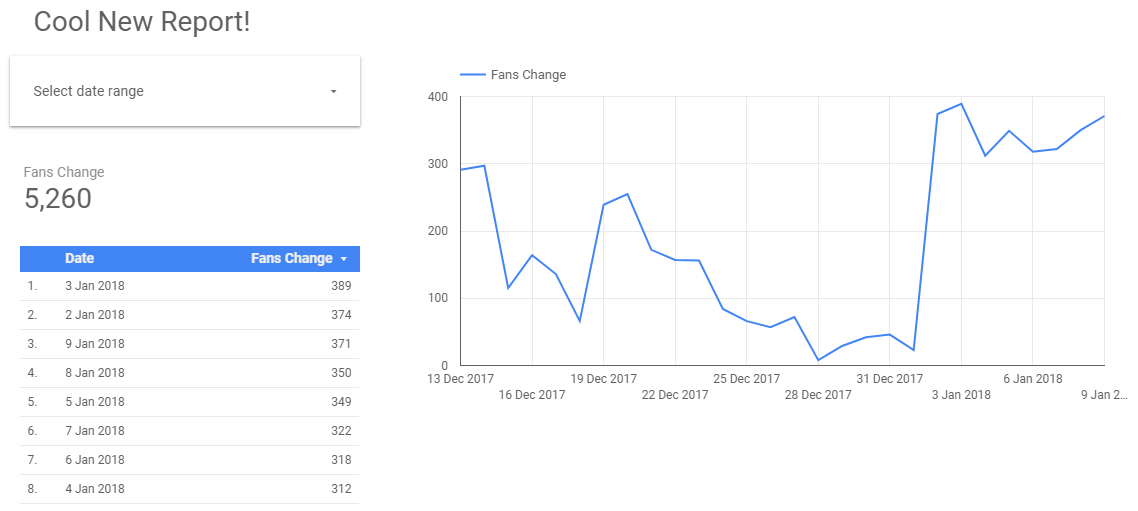
The date range can be adjusted and data within any visualization will update automatically.
Testing
It's wise to test and debug your connector as you go along. Stackdriver (part of the Google Cloud Platform suite) is what I used to test. You can access this by clicking 'View' then 'Stackdriver Logging' within Google Apps Script.
This will log custom messages from your connector as you are running it within Data Studio.
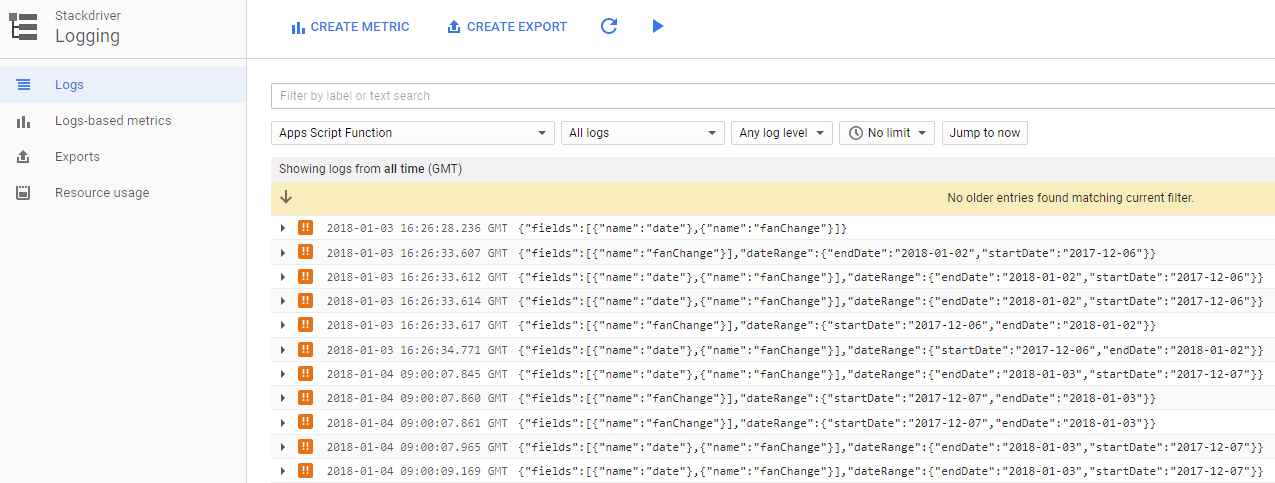
A typical console log will do this as shown in the example below.
console.error("Some error message or variable");
Final Thoughts
Data Studio is becoming a powerful and flexible platform for presenting data. The ability to create your own connectors and bring in any accessible data source adds many possibilities which we are looking forward to experimenting with.
Any questions or feedback? Please reach out to us.
Our insights
Tap into our latest thinking to discover the newest trends, innovations, and opinions direct from our team.